Subtotal: $19.99
iPhone XR Camera Lens Repair Guide Leave a comment
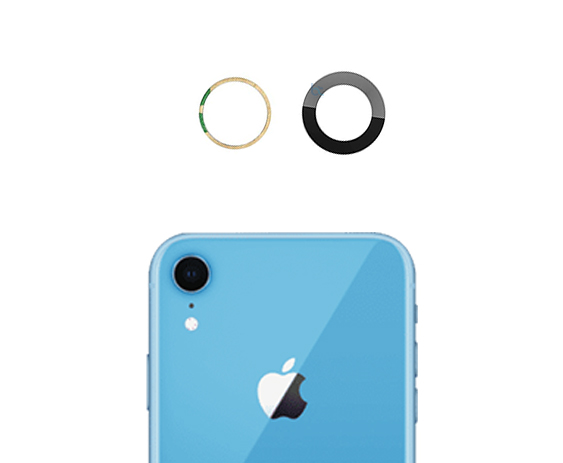
iPhone XR Rear Camera Lens Repair Guide
iPhone XR Camera Lens Glass Replacement – Repair Guide.
To undertake this repair we suggest to use the following tools within this article
- Remove the damaged Camera Glass
This step can be a little tricky and must be approached with the uttermost care. Firstly using a heat source such as a heat gun or hair dryer if a heat gun is not available, gently heat the camera lens area until it reached a temperature hot enough to loosen the adhesive.
- Extract the Broken Camera Lens Glass
Once the adhesive has been loosened with heat, this should make the removal process much easier. Using on of the tweezers from the set below, gently start removing small pieces of glass from around the camera groove. You should be very careful in doing this step as scratching the camera lens will cause damage and will need to be replaced.
- Clean the Camera Lens Groove
Once you have gently removed all the broken glass pieces from the groove it is very important to clean the groove to ensure the new lens will adhere correctly. If the cleaning process is skipped then the camera lens will not adhere to the surface. To clean the lens we suggest you use Isopropyl alcohol with a piece of cotton and wiping down the adhesive. What should remain is a very clean surface with no residue. If you struggle to do this step, for best practise we recommend to use a cotton bud doused in Isopropyl, which will help dissolve and remove the previous adhesive.
- Apply the New Lens Kit
This step should not be taken unless step 3 is done. This will ensure the new lens will adhere to the surface. Using the Beshtech iPhone XR Replacement lens kit featured below, apply the 3M adhesive to the inner edge of the camera groove. Once you have correctly placed this adhesive down using tweezers or gloves (to ensure no fingerprints are present on the lens) gently align the camera lens into the camera lens groove, applying a reasonable amount of force to activate the adhesion.
- Watch our Beshtech Technician
Simply follow us on YouTube, we will soon be uploading repair guides to help out!
For this repair you will need:
-
 6 Pcs Anti Static Precision Tweezers Stainless Steel watchmaker iPhone Repair$19.99
 -
 iPhone XR Back Camera Lens Rear Glass Glass Replacement With 3M Adhesive$13.99
 -
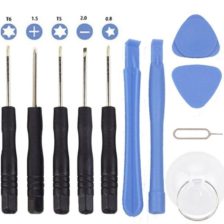 iPhone Screwdriver Set Samsung Screen Repair, Battery Repair Tool Kit 11 in 1$4.99
 -
 2 X Opening Pry Tools Plastic Spudger For iPhone For iPad Mobile Phone Repair$3.99